

Hard Surface modelling "The Royal Chariot"
- ShrutiRoyBir

- Jan 17, 2022
- 4 min read
Updated: Oct 11, 2023
3D Creation Pipeline for Film and Games (CI7890_A_TB1_21)
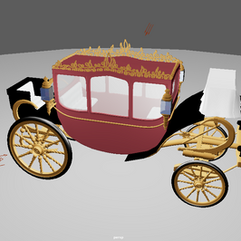
Designing Royal chariot was really a project which I enjoyed very much. The inspiration comes from the past history. During olden days kings and queens used to travel in such beautifully decorated chariots. I am always fond of such antique pieces of art.
During my stay in Sheffield back in 2013-14, I met the Queen Elizabeth II. She visits the Sheffield church on her Birthday every year. I liked her humble attitude, beautiful appearance and the way she smiles. I started watching her stories on You tube and discovered that the Queen still travels in her Royal Chariot occasionally. I liked the design of chariot a lot as it is similar to chariots used by Royal families in India. So, I decided to design a royal chariot of Queen Elizabeth.


The aim of this project was to learn how to design hard surface models in Maya. The fundamental of hard surface modelling, topology, creating different shapes, baking the shape with edge loop etc.
I used the design as a reference only, did not copy the exact design instead I simplified the mechanism of a chariot machinery, so that I can successfully design and complete it. I divided the chariot body into 3 parts - left part, right part and middle part. Left and right part is same but the mirror of each other.
Middle part has main carriage and machinery and small other elements to support the chariot.
I started with the wheel design first. It is similar to a wheel of a cycle but has larger and heavier parts with more designs to it.
I make a basic wheel shape out of a cylinder. I start to build up the details on the wheel by the process of extruding and deleting to make a basic shape and design of the wheel.
The rods or spokes had a sort of twisty design to it which is extremely hard to make manually in Maya, that's also why there are tools made to help us do these things. I used the twist deformer tool to make this design on the spokes of the wheel.

I used a quick trick to duplicate my spokes equally in the wheel. Instead of duplicating them and then placing them manually on the wheel I used a NURBS circle as a motion path to have the rod spinning around. I go to the clip where I need my object to be, in this case I will be selecting my rod, and I just have to duplicate it.
Also, during my modelling process I made sure to check for any problems in the geometry of the model.
After modelling the wheel I bevel many edges to get the finished look I was going for.

I create a new file where I'll be making my main royal chariot model. It was hard to find references for the chariot since there's a lot of machinery in it which is not very much visible. I tried my best to make the model look sensible and not make it seem like it has missing pieces.
I make everything out of basic shapes. This process is the block out. I followed these similar steps while modelling the Eiffel tower phone. Making block outs first is helpful when you're making big projects or complicated ideas.

Getting the proportion right was also difficult. I tried to google the proportions but I felt a bit lost. So, I decided to just play with it to make it look right.
I continue making the block outs and also slowly start to polish out my model. This is where I started to run out of time. I couldn't clean up all the small problems that came up in the clean up process since I didn't have much time left.

In a support session I was suggested to add a drivers seat in the front. So, I searched for another reference image. The reference I was taking did not have the front seat because it is directly attached to the horse and the drivers are sitting on the horse to pull the chariot.
I was planning on using nclothing on the seat to make the cloth look more realistic and I also wanted to learn how to use it. I watched a few videos but then decided to move on. I decided that If I get time at the end I would test it out. But, for now I made a mesh that gave an effect of a cloth laid on a seat.


I slowly started to come to the end of the modelling phase. I started to add some other details such as some seats in the chariot which is also an important part of the modelling.

ZBRUSH
The details on the top of the chariot were made in Zbrush. I wish I could have spent more time on the design at the top but at this moment I had to start adding my Arnold textures and start the render. So I quickly made a design for the top of the chariot so that it didn't look bland and in-complete.

I added AIStandardSurface and the actual royal chariot has red and gold colors to it. To make the gold texture I brought the roughness value a bit up and changed the IOR value to 0.470 which is the IOR value of gold. I played a bit with anisotropy and rotation to something that I liked. I colored the main chariot a metal red to let it stand out from the gold. I gave a normal cloth texture to the front seat.
When I was rendering the turntable animation the jpeg images weren't being opened and it said that the file format wasn't supported. I had the render going on for almost 5-7 hours but at the end after changing my sequence format to tiff the render finally worked.


Comments