

Character modelling
- ShrutiRoyBir

- Jan 17, 2022
- 4 min read
Updated: Jan 17, 2022
3D Creation Pipeline for Film and Games (CI7890_A_TB1_21)
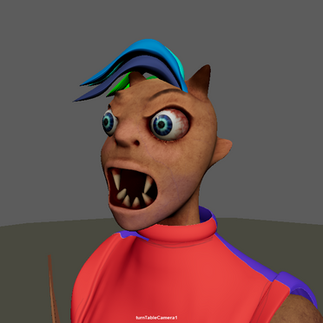
For this module, first I wanted to create a scary creature that has unique combination of body parts; may be like wolf head, hairy animal body, legs like a tree with roots etc, like deviant in marvel movies or aliens from other planet but civilized. I struggled to come up with the exact idea that I can imagine and I couldn't draw it on paper. I played with many illustrations in initial stage of this project.


I have already created 3 different characters for another module, If you like to see these characters click on the bellow link.
I have created another hard surface character a talking planet robot for a group project where we have created a virtual travel app based on VR. There is a link below if you like to know about the project I am working on.
That's why my aim was to create something different this time. The aim was to learn a different design technique with different software like Maya, Zbrush and for texturing I have used 3D Substance painter.
I have created the basic model in Maya as I have been using this software for an year now and I am comfortable with it. I am not very fond of Zbrush yet so I decided to add some minor details in Zbrush and texturing the head and skin in 3d Substance painter.
I created the basic model in Maya since I was more comfortable with it. After creating the model in Maya I take the head and export it as a high poly mesh and import it into Zbrush.
I modify quite a bit of the character and add some fun elements like the horns and teeth. I export the file from Zbrush and import it into Maya.
Now, to move onto Substance Painter I have to UV map the head, body and eyes since I will be texturing them in substance painter.
I followed these internal tutorials for UV mapping provided to us by our supervisors:
Substance Painter
To texture the head of my character I used 3D Substance Painter. To learn the technical part like how to export the file from Maya, preparing the file for substance painter, I followed the internal tutorial provided by our supervisor. The links are provided below:
Preparing and texturing in Substance Painter: https://canvas.kingston.ac.uk/courses/21719/pages/texturing-workshop-low-poly-barrel
Specifically I wanted to create a realistic skin so I followed one external tutorial video from Youtube.
The links are provided below:
I started to export my files as FBX files from Maya to export in Substance painter but I had already gotten into a problem.
It wasn't a huge problem since it didn't ruin the model in any way but I also couldn't find the option of disabling split per-vertex normals.


I import the file and change my settings to 2K. Once the file is imported I select the Bake Mesh Maps option. My project folder automatically shows me the texture files after the baking is done.

For my first texture layer I created a fill layer and added a black mask to it. I right click on the black mask and added a generator and selected dirt generator. Then I give the fill layer a dark, bloody red color to it.
I add another dirt generator but change the color to a dirty light pink.

While I was doing the texturing I realized I didn't export the eyes with the head so I export the head and eyes together again and followed the previous steps. Before exporting the eyes and head mesh from maya I gave both the meshs the lambert texture.
I go to the skin tab from the textures shelf and drag Skin Face texture onto a new layer. This creates a skin texture which we will be making further adjustments on.
I saw a texture problem at the ear which I tried fixing using tri-planar projection but it didn’t work. I assume the texturing problem came from the UV mapping of the model.

I create many paint layers to create the brows, color the horns, teeth and to add red, blue and yellow zones on the head.
I create a paint layer and I added some veins using the Brush hard tool and changed the opacity of the layer to 9. I used a dark blue for the veins and used some reference images from the internet to understand the flow of the veins on our faces. The veins give the skin texture a realistic look.

I wanted to use a texture file for the eyes so I added the file by clicking the import resources button.
Then, I click the projection and I drag and drop the texture file to the base color in the projection properties tab.
By pressing 'S' on our keyboard we can use the middle mouse button to move the projection image. Using right click we can also shrink the image size to make it fit the eyes. Using the brush tool I just simply paint on the eyes and the image gets painted on the eyes.

Using the stamp tool I fix the texture of some visible areas of the eyes.
Btw, I forgot to mention, all textures that I have used for this model is from Pixabay, these are free assers downloaded from Pixabay, https://pixabay.com/ .

Finally, I’m finished! I will now export the texture and I will be saving them in my source images folder.
I follow the export process twice. Once I export the height and normals texture separately with 16 bits and the other texture files are exported with 8 bits.
I create a height and normal output template and change my settings to export those files.

Now Im ready to use the texture files. I already have turned on the substance painter plug-in from the plug-in manager in Maya. Now I will be making a directory for my Maya workflow texture files.
Then I have to open Arnold Hypershade and apply my texture files to my model.

Finally, to finish the model, I quickly textured and UV mapped the shirt and pant in Photoshop.


Comments